Color plays a powerful role in shaping children’s emotions and behavior, especially through custom plush toys. From...
An Easy Step-by-Step Guide to Crafting Your Own Toy Chica Plush Toy
Introduction
Do you have a soft spot for the iconic animatronic characters from Five Nights at Freddy’s? If you do, then you’ll probably appreciate learning how to make your own Toy Chica plush toy. This cost-effective and fun project can be done in just a few hours and requires only basic craft supplies. With a few simple steps, you can make your own Toy Chica plush toy and show your creative skills to your friends.
What You’ll Need
• Fabric: You’ll need a piece of fabric that’s large enough to cover the size of the Toy Chica plush toy. Cotton or fleece fabric works well for this project.
• Sewing machine: This isn’t a necessary item, but it will definitely save you time and effort if you have one.
• Needles, pins, and thread: If you don’t have a sewing machine, you’ll need these items to stitch the pieces together by hand.
• Polyester stuffing: This will help give your Toy Chica plush toy a soft and cuddly texture.
• Hot glue gun and glue sticks: This will help you attach the small details to your Toy Chica plush toy.
• Scissors
• Pattern paper: This will help you create the template for your Toy Chica plush toy.
• Pen/pencil
• Ruler
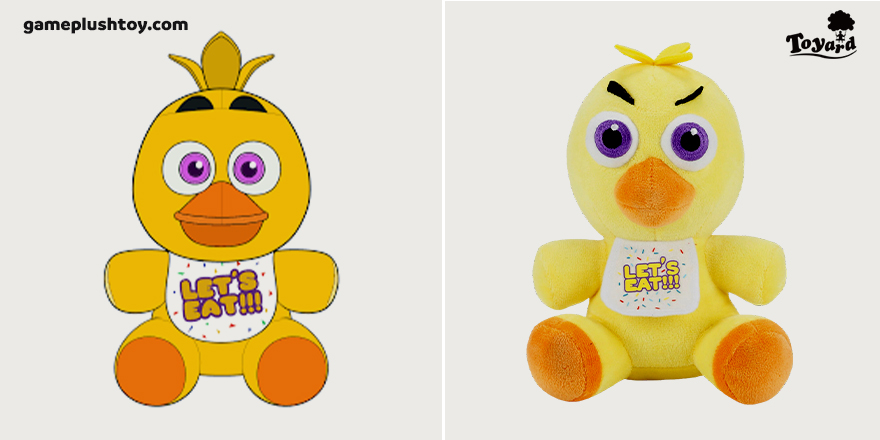
Step 1: Draw the Toy Chica Plush Template
The first step is to draw the template for your Toy Chica plush toy. Take your pattern paper and draw a rectangle with the following dimensions: 10 inches in length and 5 inches in width. This will be the body of your Toy Chica plush toy. Now, draw two circles at the top of the rectangle for the head and two smaller circles at the bottom for the feet. Finally, draw two curved lines from the bottom of the body to the feet. This will be the pattern for your Toy Chica plush toy.
Step 2: Cut Out the Template
Once you’ve drawn the template, it’s time to cut it out. Use your scissors to cut out the pattern pieces carefully. Be sure to leave a 1/4-inch seam allowance around each piece.
Step 3: Cut the Fabric
Now that you have your template, it’s time to cut the fabric. Take your fabric and place it on a flat surface. Place the template pieces on top of the fabric and trace them around them with a pen or pencil. Cut out the pieces and make sure to leave a 1/4-inch seam allowance around each piece..
Step 4: Sew the Pieces Together
Once you’ve cut out the fabric pieces, it’s time to sew them together. If you have a sewing machine, you can use it to quickly stitch the pieces together. If you don’t have a machine, you can use a needle and thread to hand-stitch the pieces together.
Start with the body pieces and stitch them together along the sides and bottom. Next, stitch the head pieces together, leaving the top open. Once you’ve sewn the head and body together, stitch the feet pieces together. Finally, stitch the head, body, and feet pieces together. Make sure to leave the top of the head open so you can stuff your Toy Chica plush toy.
Step 5: Stuff the Toy Chica Plush Toy
Now it’s time to stuff your Toy Chica plush toy. Take your polyester stuffing and insert it into the body and head of the plush toy. You can use your hands or a spoon to help you push the stuffing into the tight corners. Once you’ve filled the body and head with stuffing, sew the top of the head closed.
Step 6: Add the Details
The last step is to add small details to your Toy Chica plush toy. For example, you can use hot glue and fabric scraps to create the eyes and mouth. You can also use fabric scraps to create the arms and legs. Once you’ve added all the details, your Toy Chica plush toy is ready to show off.
Conclusion
Making your own Toy Chica plush toy is a great way to show off your creative skills and have fun. With just a few simple materials and techniques, you can make your own Toy Chica plush toy in just a few hours. So grab your supplies, follow the steps above, and get to work on your own Toy Chica plush toy.
Reprint statement of blog content: All the blog content and image are original, copy right by Gift-supplier.com. The reprint statement must be included with our permission. Gift-supplier are not responsible for reprint for similar content or contains trademark and other infringement reprint statements. Please contact us if there is infringement content.
Leave a comment
Log in to post comments






Top authors